Everyday Content Lab

Make your real life easier to film.

Simple setups. Everyday angles. No production experience needed.

Start here

You do not need more equipment. You need a repeatable way to get the shot.

This section shows you what to film, where to put your phone, and how to capture enough angles to make a simple everyday vlog feel intentional.

Your 60 second setup

Before you press record

Do these four things first. This is enough for most everyday B roll.

1Clean your lens. It sounds small, but it makes a bigger difference than another filter ever will.
2Film vertically. Keep your phone in 9:16 for Reels, TikTok, Shorts and mini vlogs.
3Use a light source. Natural light works really well if you do not have a light. If you do, use whatever light source you have, like a ring light, clip light, or small creator light. The goal is clear footage.
4Record longer than the final clip. Give yourself 5 to 10 seconds so you have room to trim later.
KEEP IT SIMPLE

What You Actually Need to Get Started

You do not need a complicated creator setup. Start with the basics and worry about the advanced gear later.

01

A phone

Your phone is enough. If you already have a camera, you can use that too, but you do not need one to start.

02

A tripod

You just need something that can hold your phone steady and let you place it where you need it.

03

A light source

Natural light works really well. You can also use a ring light, clip light, or another simple light source to help keep your footage clear and bright.

That is enough to start. Worry about the advanced stuff later.
See My Favorite Tripods + Lights
Lesson 01

Your simple filming setup

You only need three things to start: a phone, a tripod, and a light source.

1

Choose the moment first

Do not start by asking, “What content should I make?” Start with what you are already doing. Coffee. Getting ready. Working. Cleaning. Cooking. Leaving the house.

2

Place the tripod before you perform the moment

Set the phone where it can see the action clearly. Then step into the frame and do the thing naturally. You are capturing your life, not acting out a commercial.

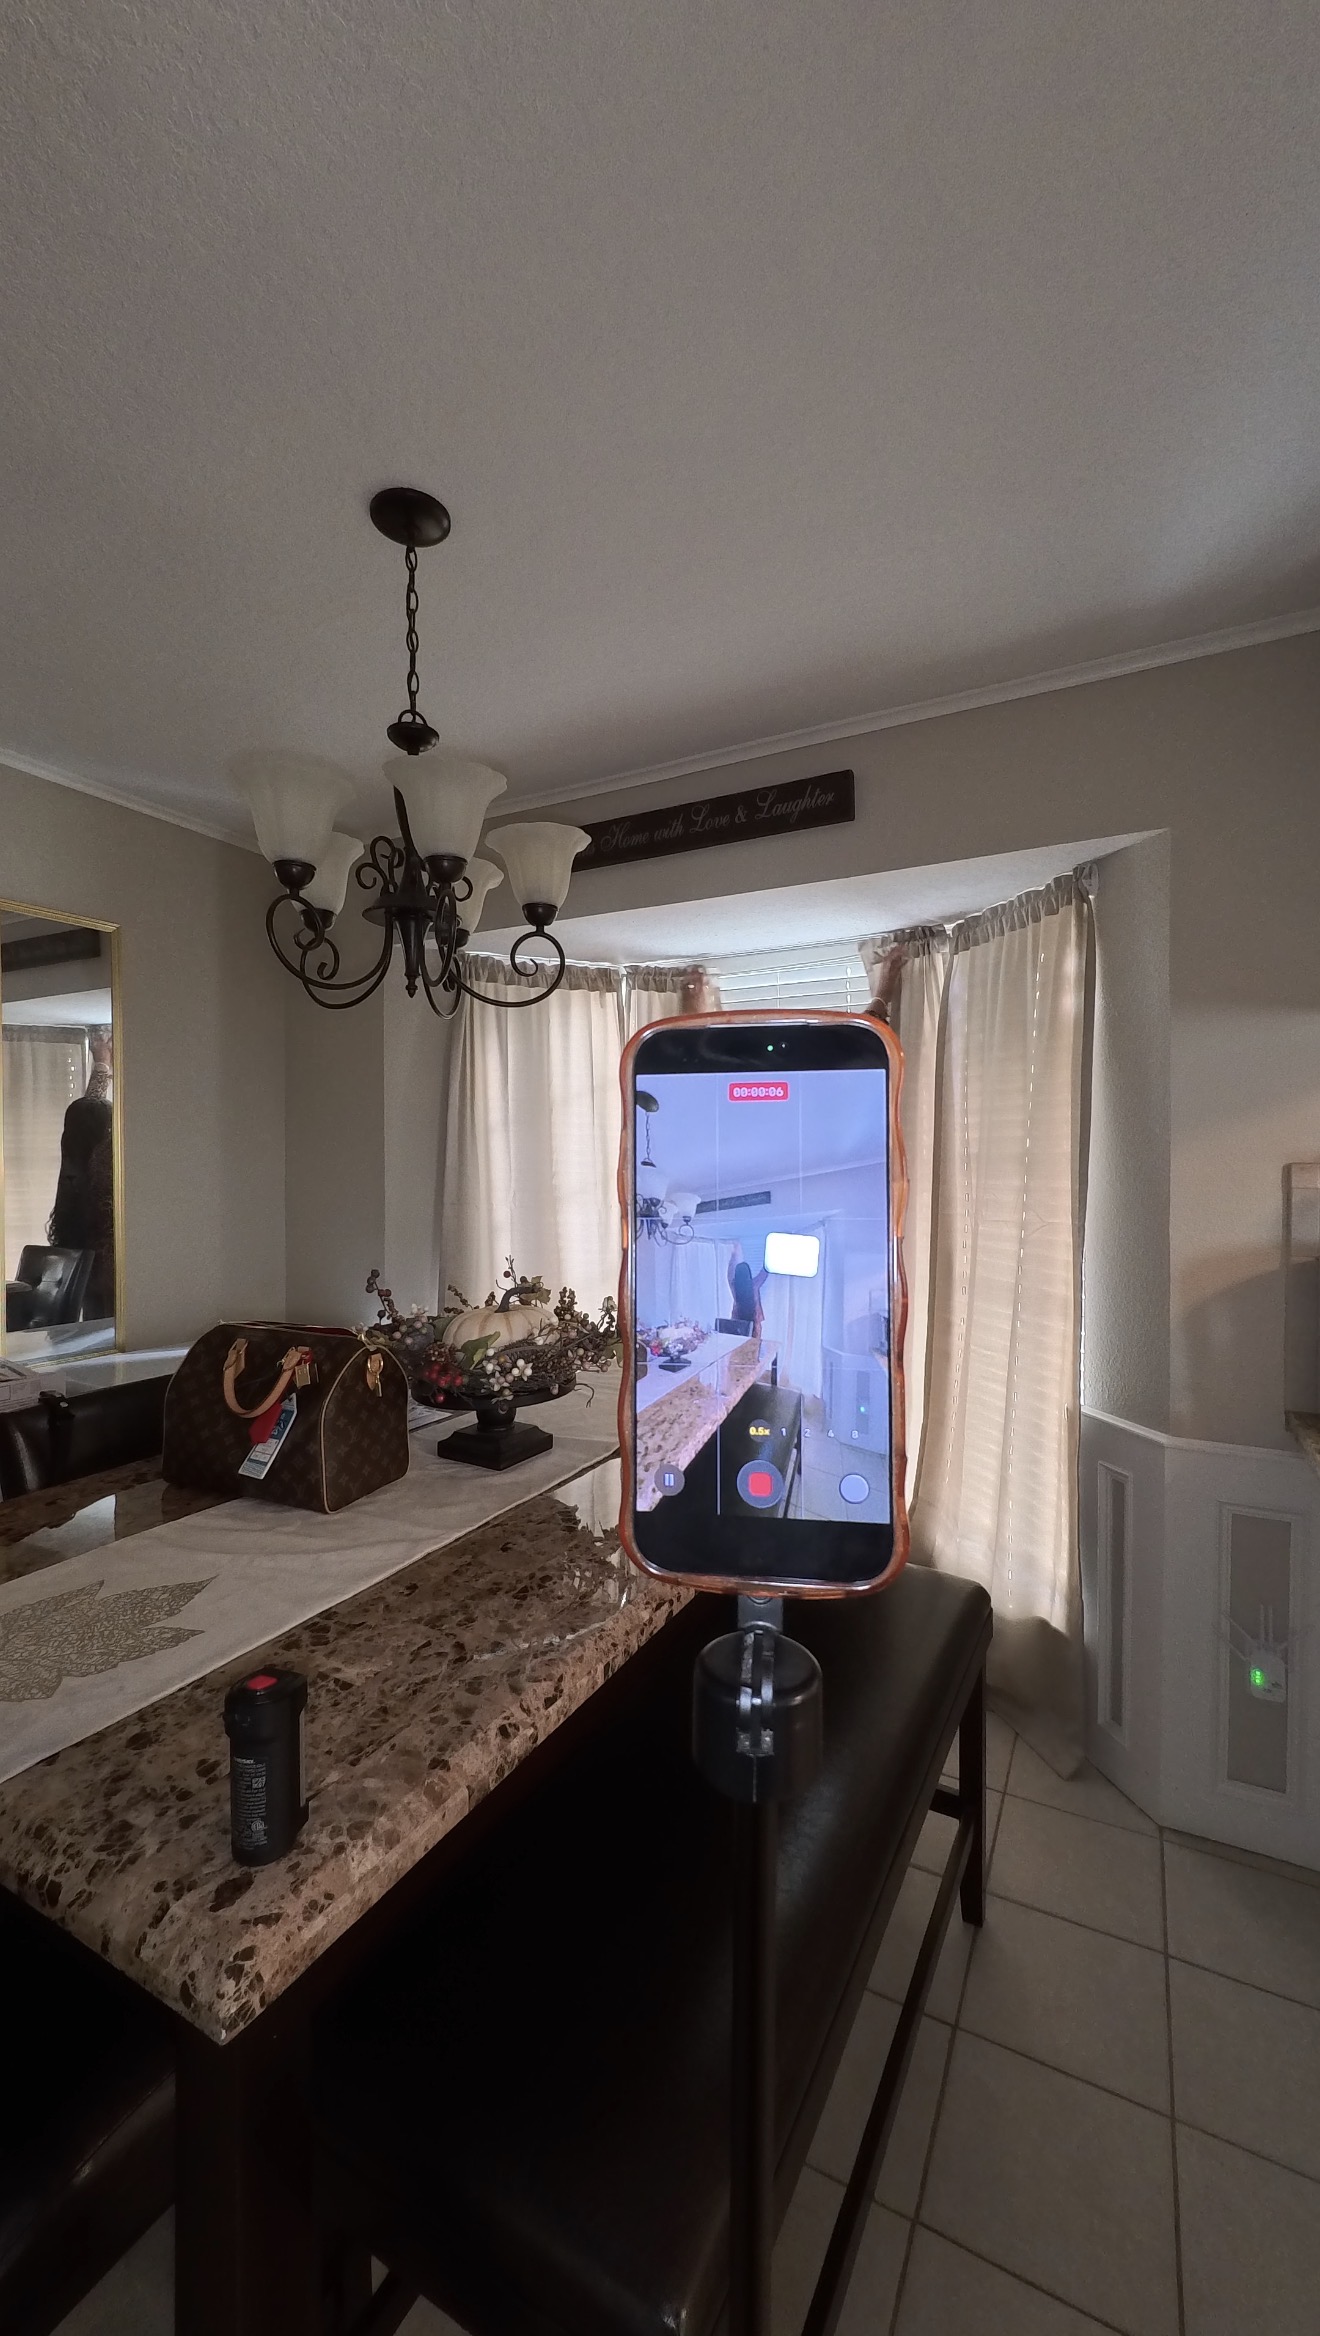
Phone on tripod set up across the room to film a curtain-opening shot in the dining area
Setup photo

Place the phone where it can see the whole moment.

Here the phone is set up across the room at about counter height so it can capture both the window and the movement clearly.

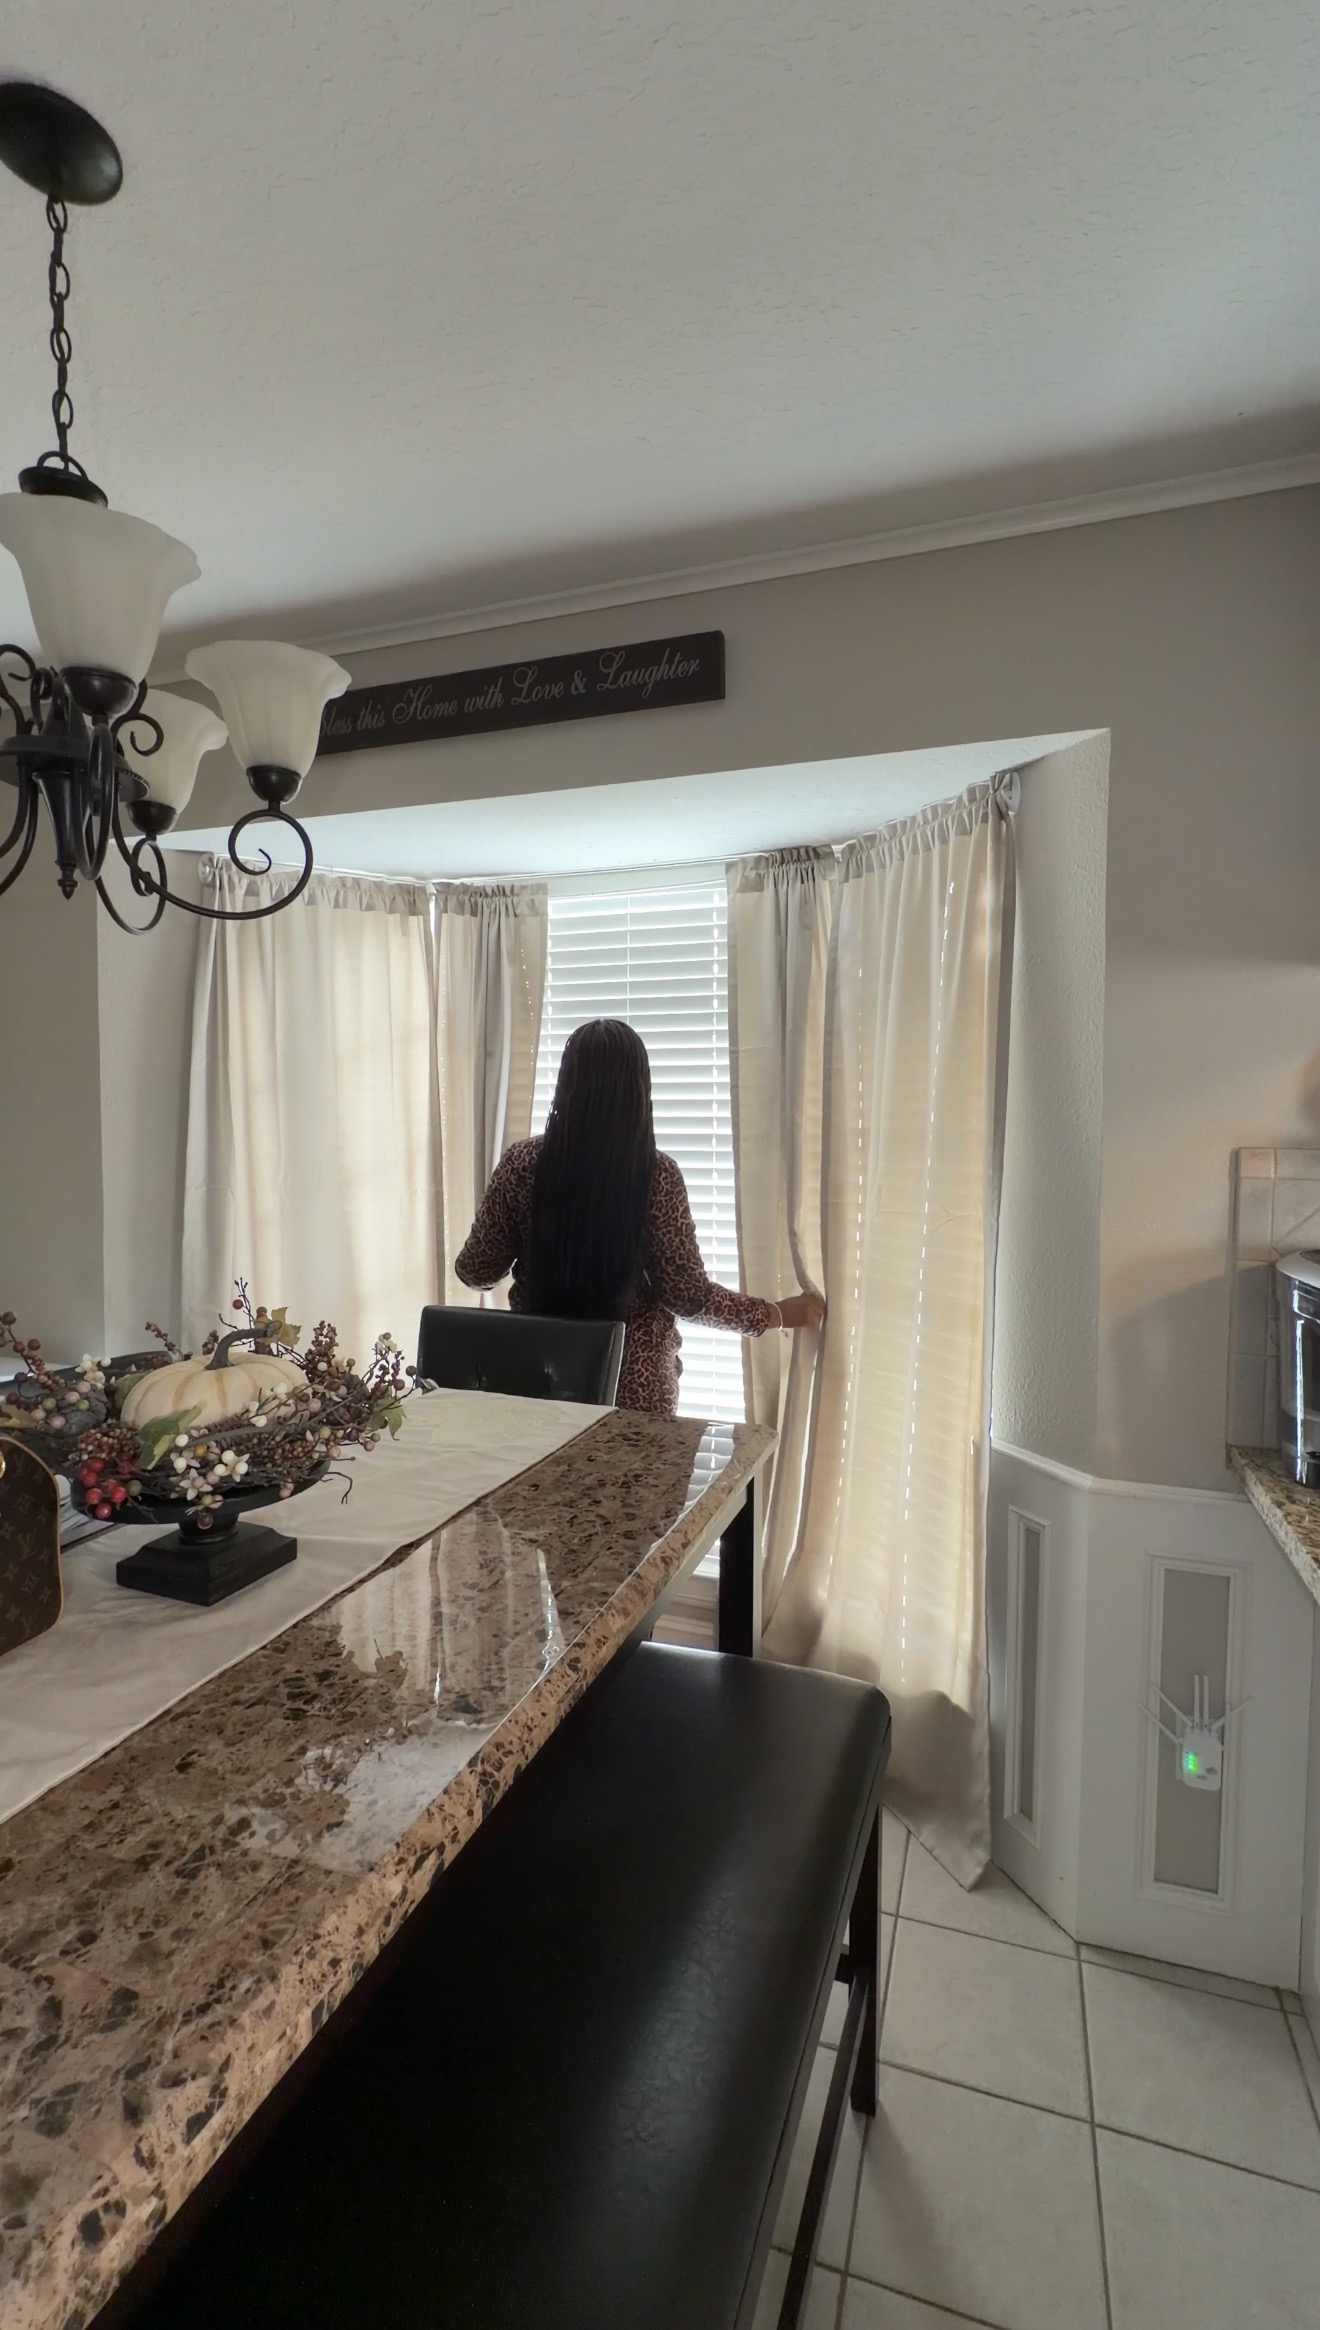
Finished vertical shot of a woman opening curtains by the window in a dining area
Finished shot

This is what that setup produced.

The final shot feels clean and natural because the frame shows the full scene, your movement, and the light coming through the window.

Why this works: the setup is far enough back to capture the whole action, which makes the final clip feel more intentional and less cramped.
3

Get the wide shot first

Your wide shot gives the viewer context. Let them see you and the space before you move into close ups and details.

Easy rule: if the viewer cannot immediately tell what you are doing or where you are, move the tripod farther back.
4

Then move closer

Once you have the full scene, capture one or two details. Your hand pouring the coffee. The planner opening. The keys going into your bag. Your shoes walking out the door.

Remember this

One moment. A few angles. That is enough.

You are not trying to document every second. You are collecting just enough visual pieces to tell the story once you get into CapCut.

Lesson 02

The 5 everyday angles

These are the five angles you will use over and over. The framing stays the same. The movement happens inside the frame.

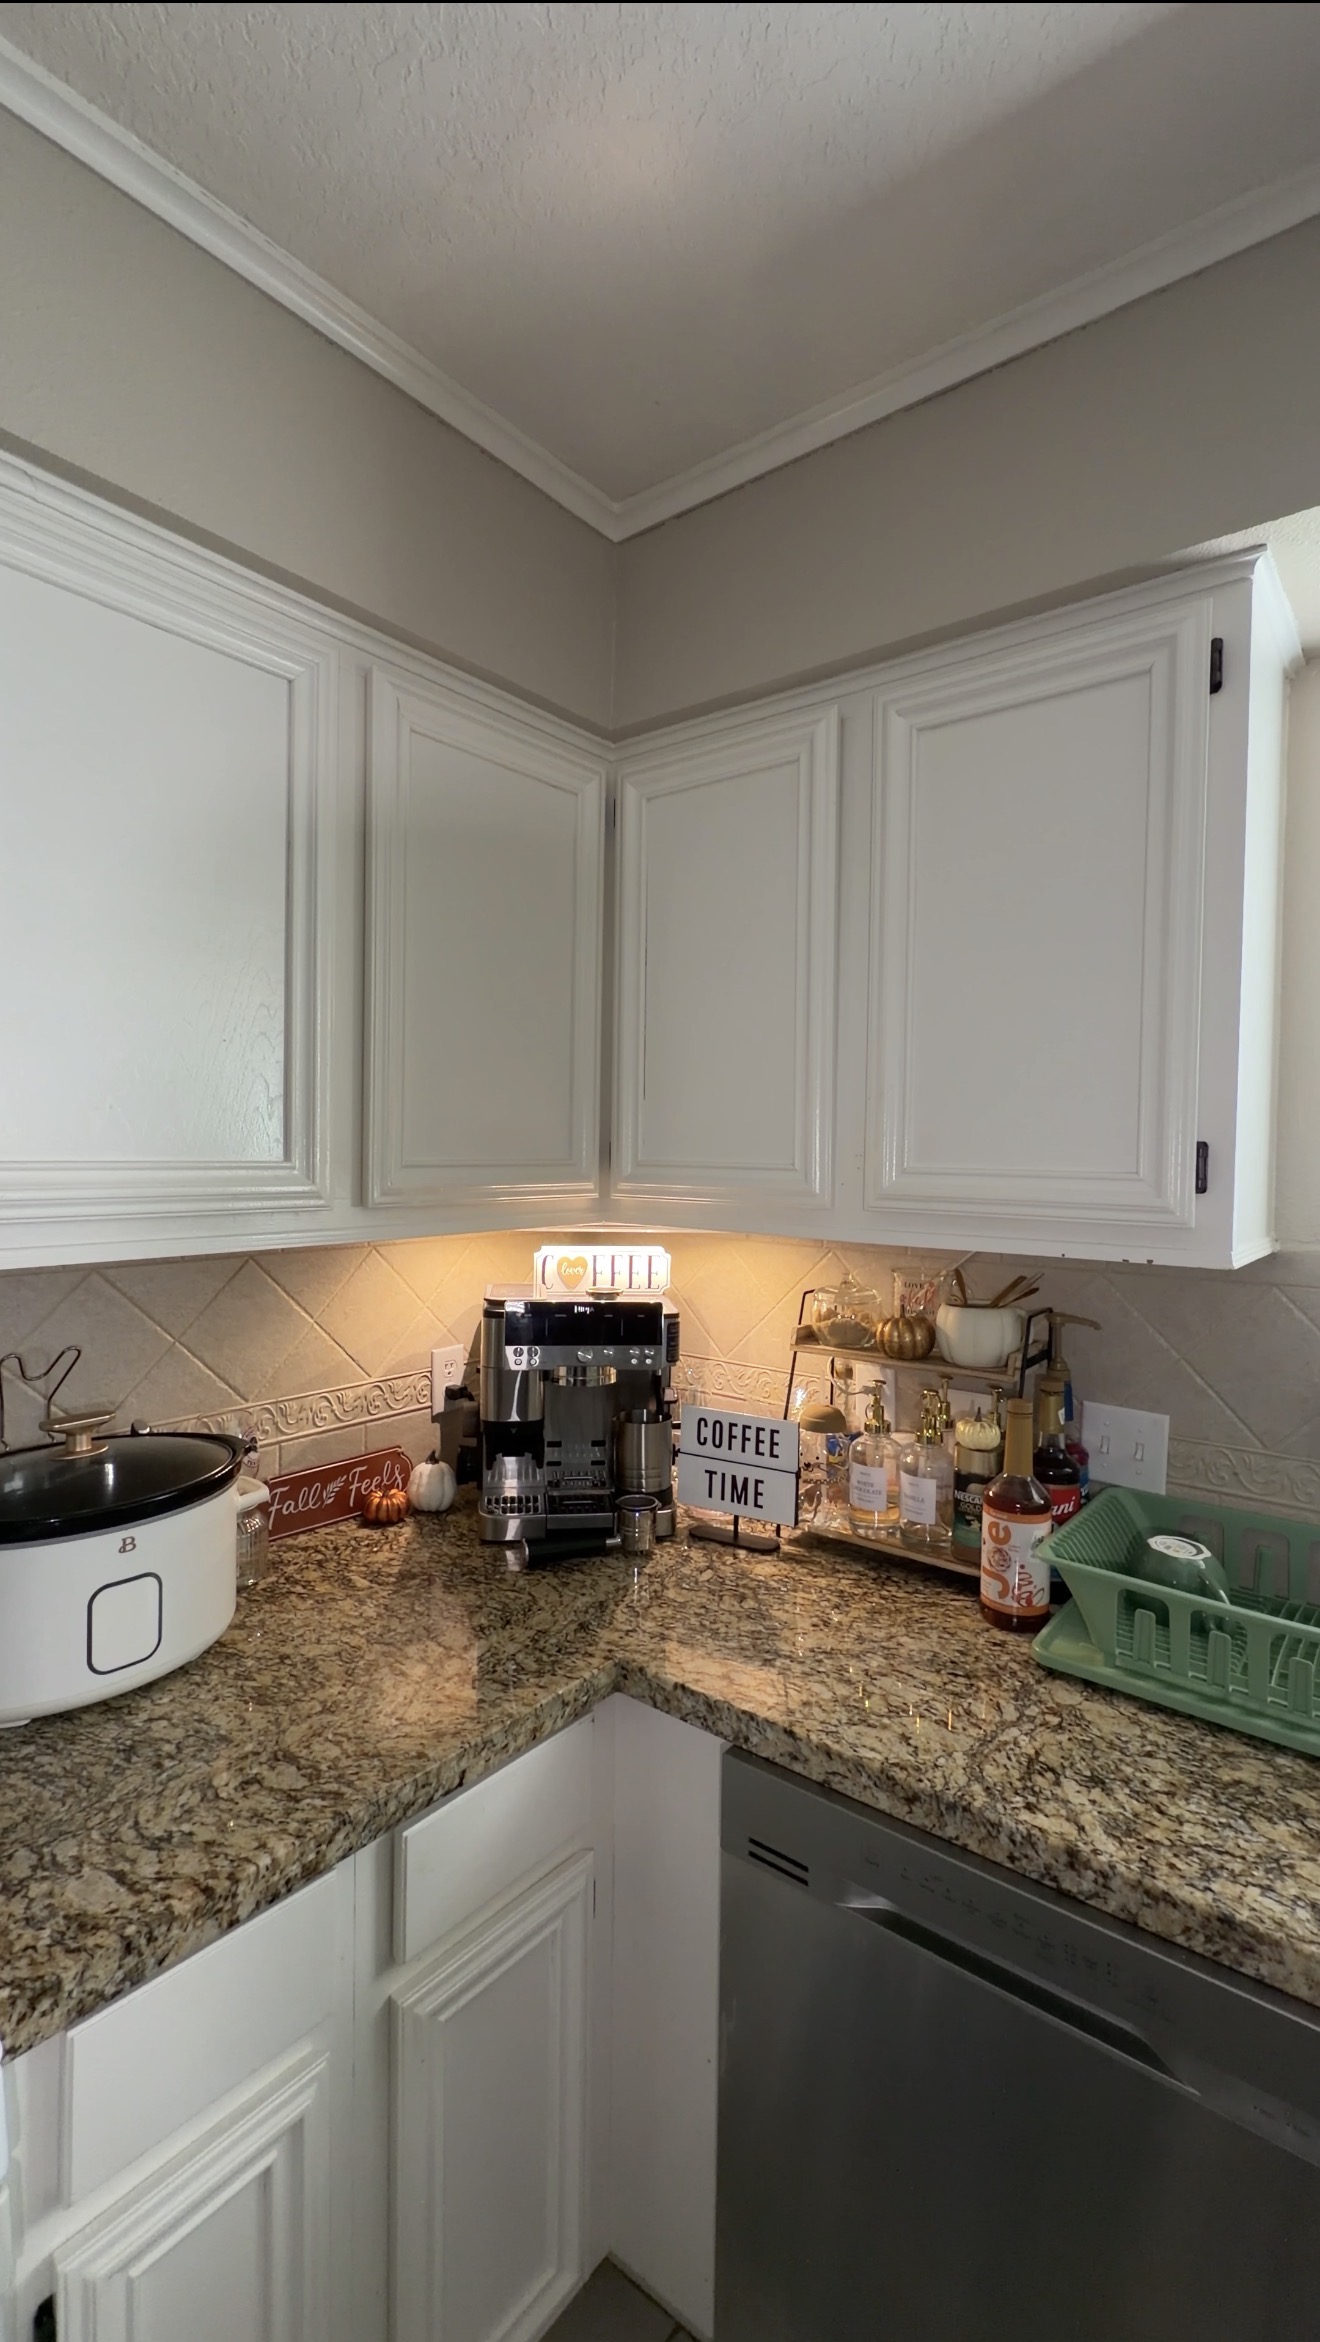
Wide shot of a kitchen coffee station showing the full scene
Angle 01

Wide Shot

A wide shot shows the full space so the viewer immediately understands the setting.

Use it for: showing the room, the counter, the desk, the bed, or the full moment before you move closer.
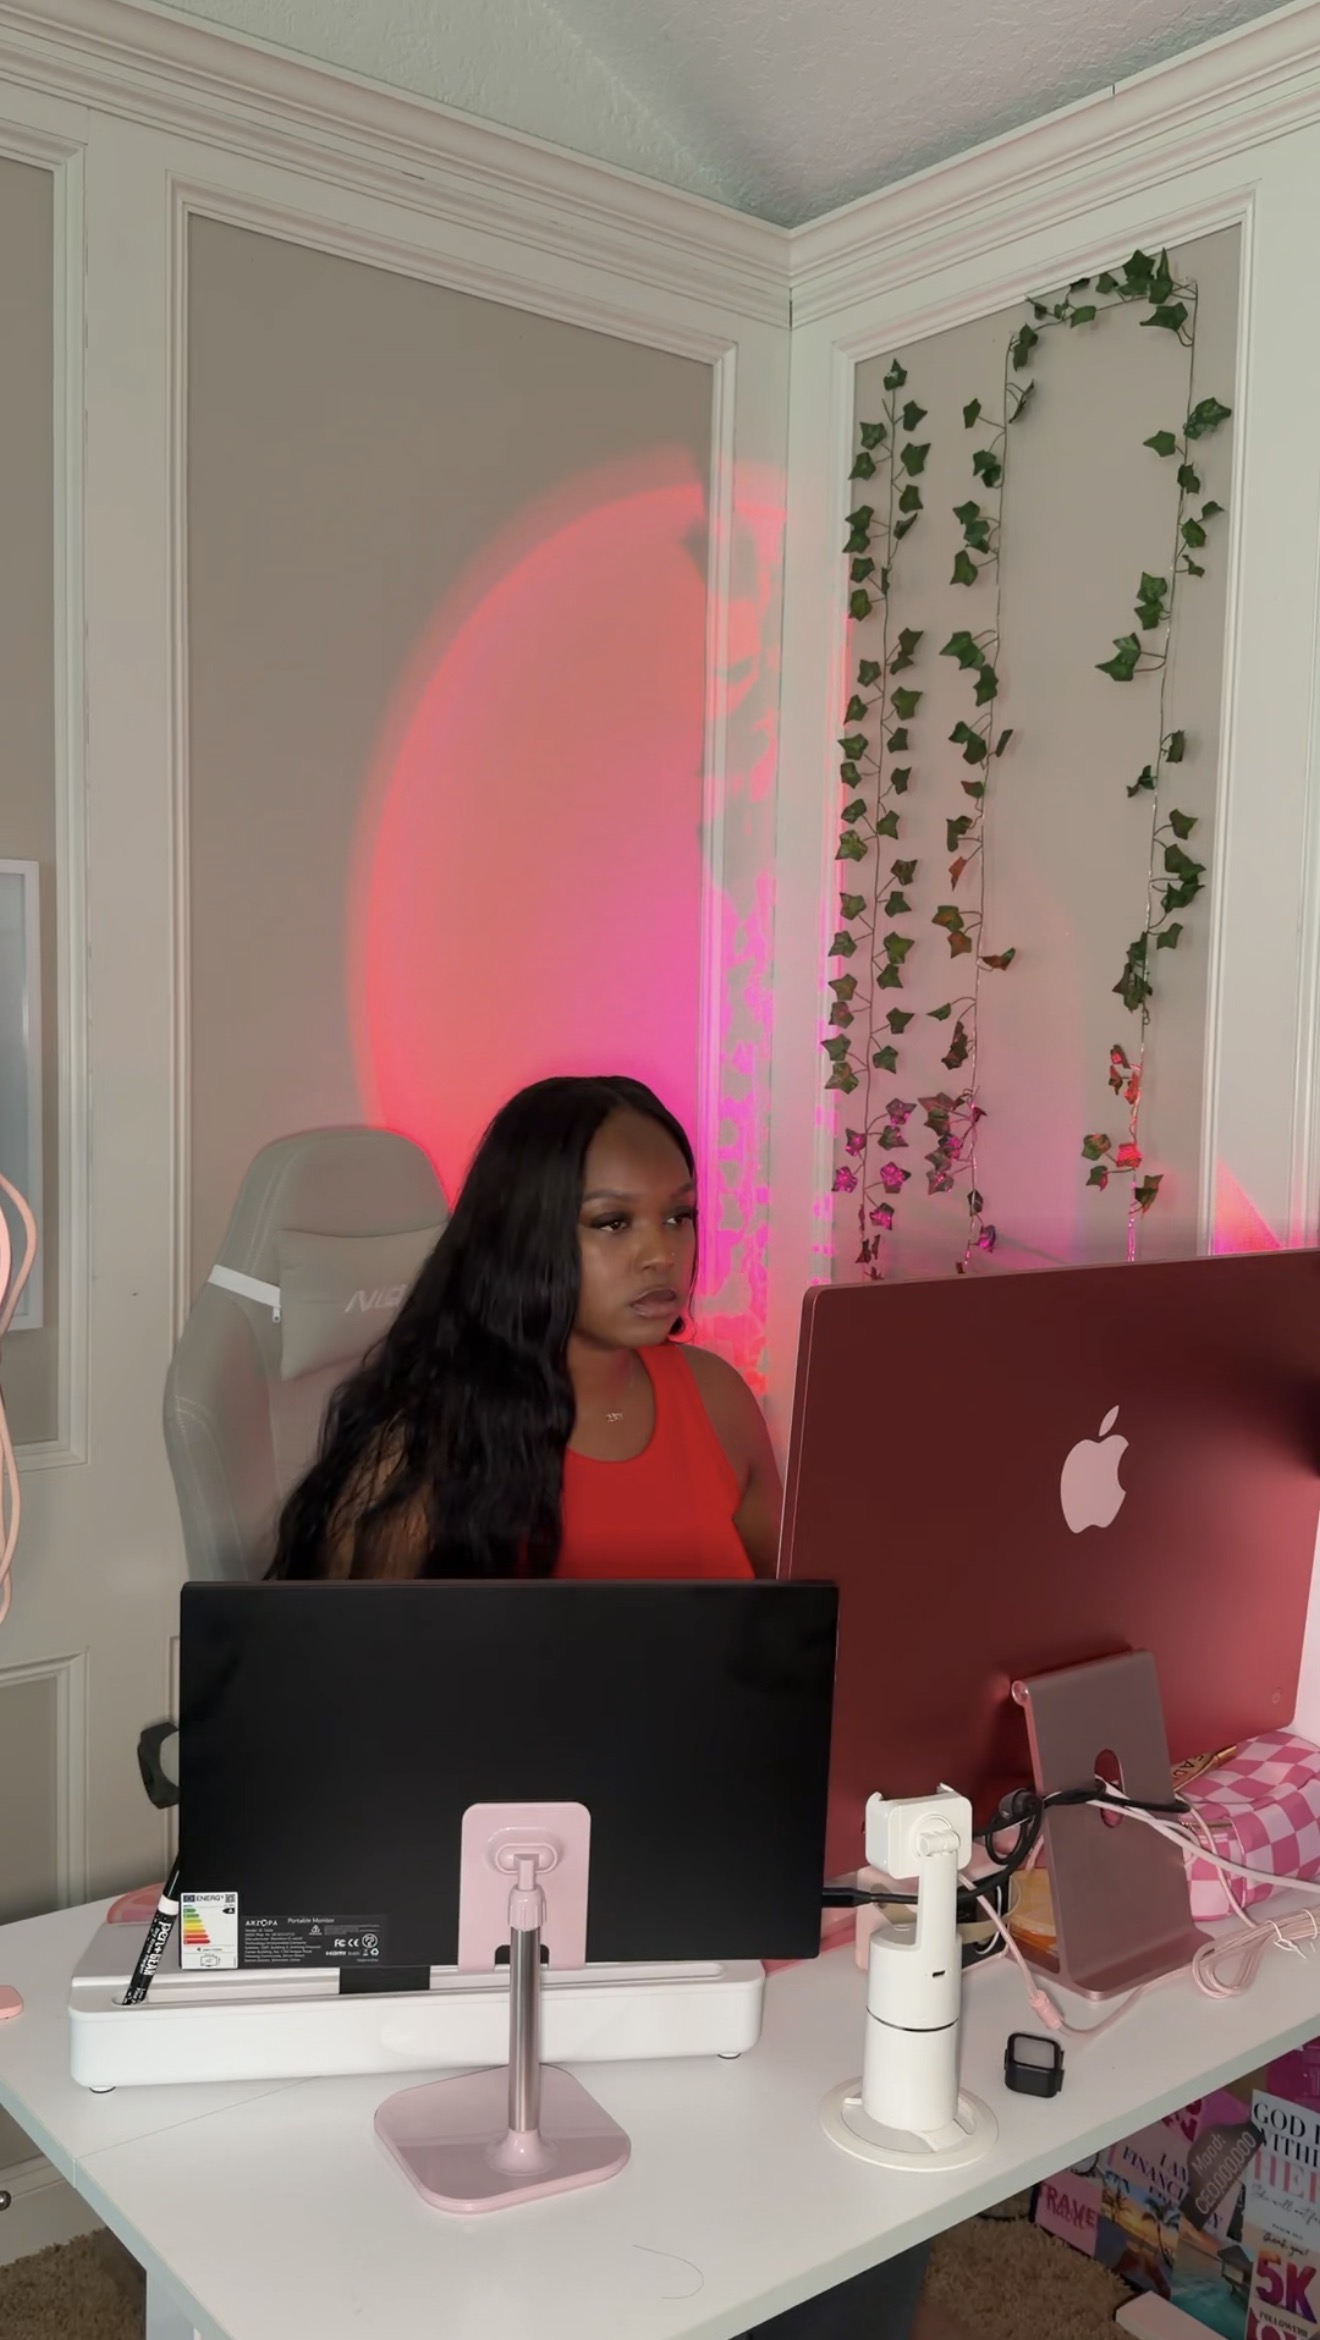
Mid shot of a woman sitting at her desk working at a computer
Angle 02

Mid Shot

A mid shot brings the viewer closer to you and the action without needing to show the whole room.

Use it for: working at your desk, getting ready, cooking, sitting down, or doing the main action.
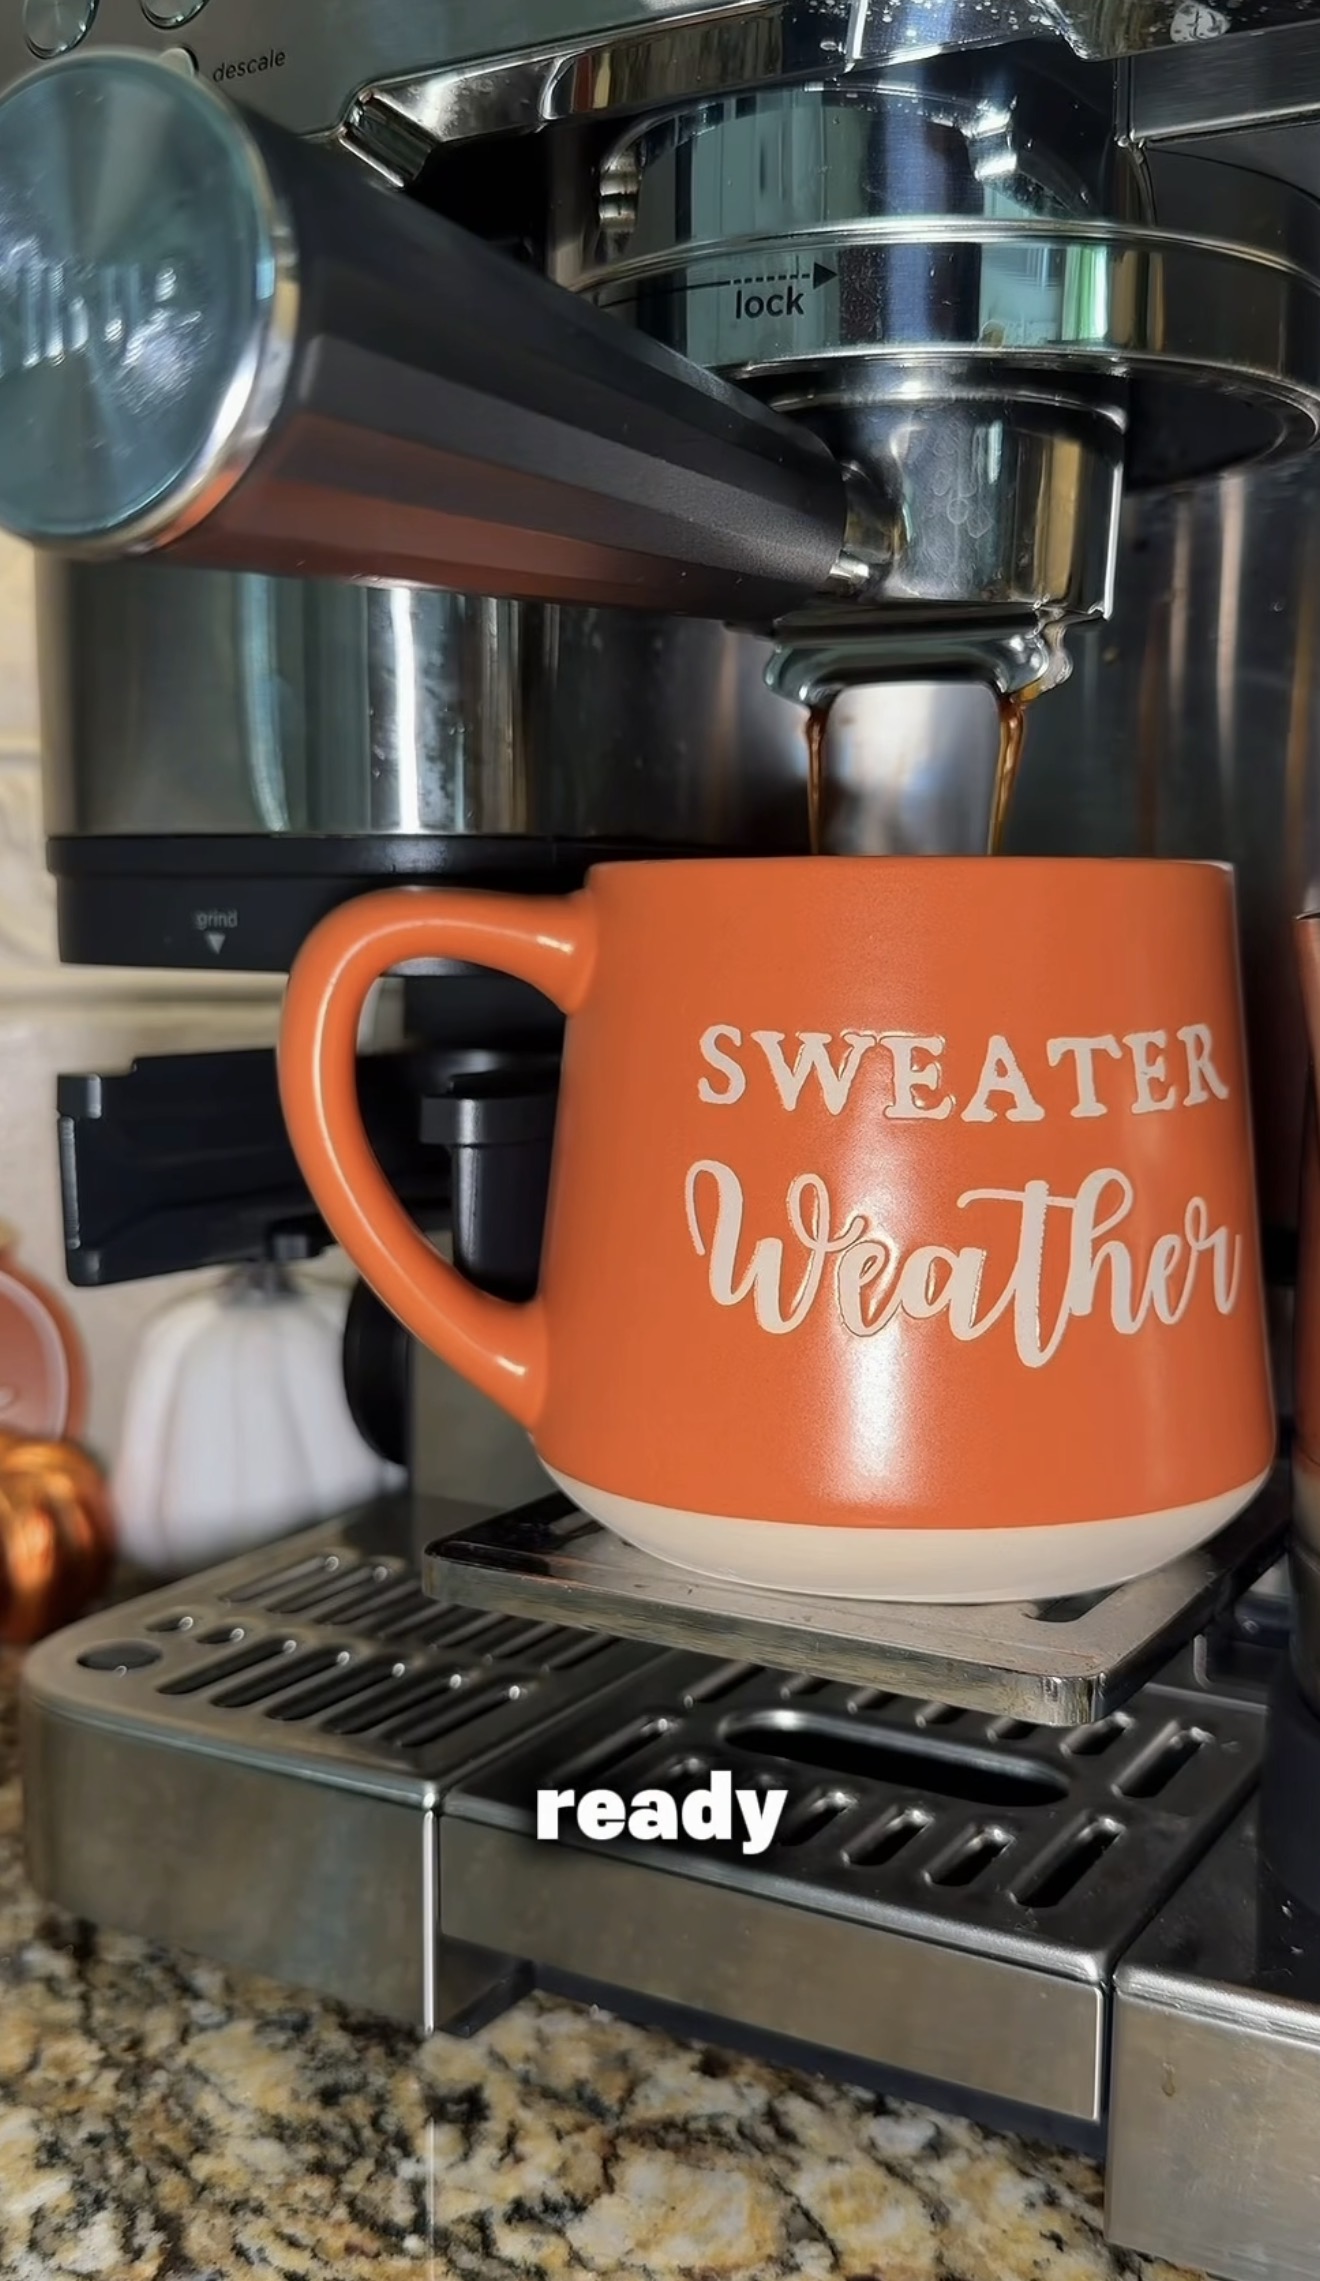
Close-up detail shot of coffee pouring into an orange mug under an espresso machine
Angle 03

Close-Up / Detail Shot

This angle focuses on one small part of the moment and makes simple content feel more intentional.

Use it for: hands, coffee pouring, skincare, typing, writing, opening a planner, or any little detail you want to highlight.
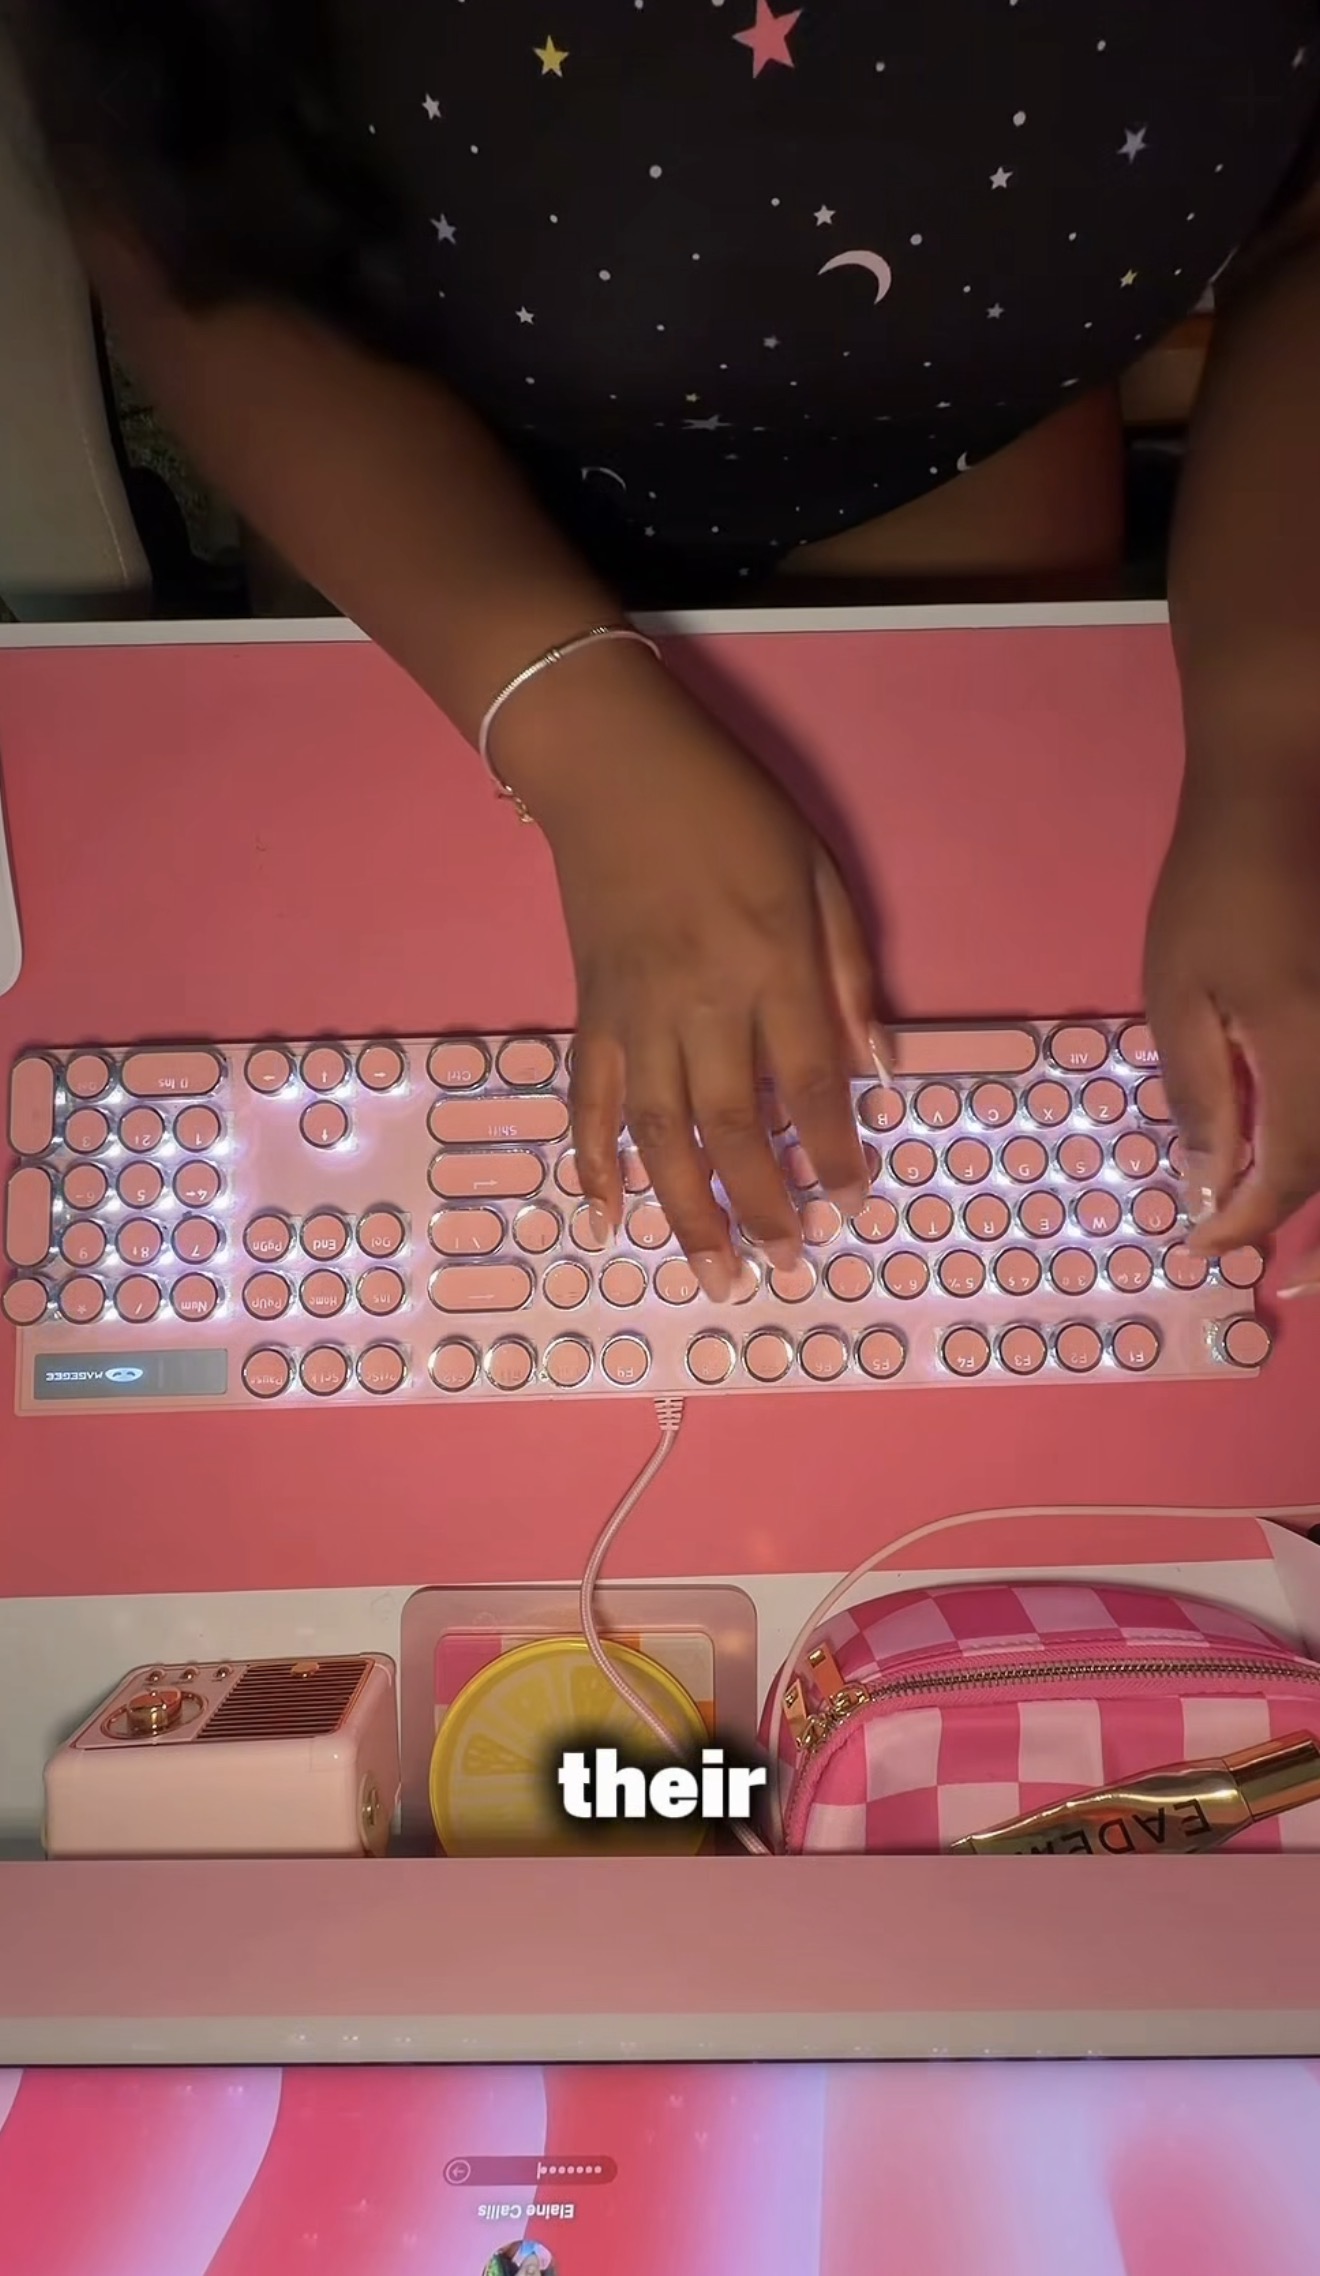
High angle overview shot looking down at hands typing on a pink keyboard
Angle 04

High Angle / Overview Shot

A high angle gives a top-down or elevated view, which helps break up the other shots and adds variety.

Use it for: desks, planners, meal prep, packaging orders, laptop work, or anything you want the viewer to see from above.
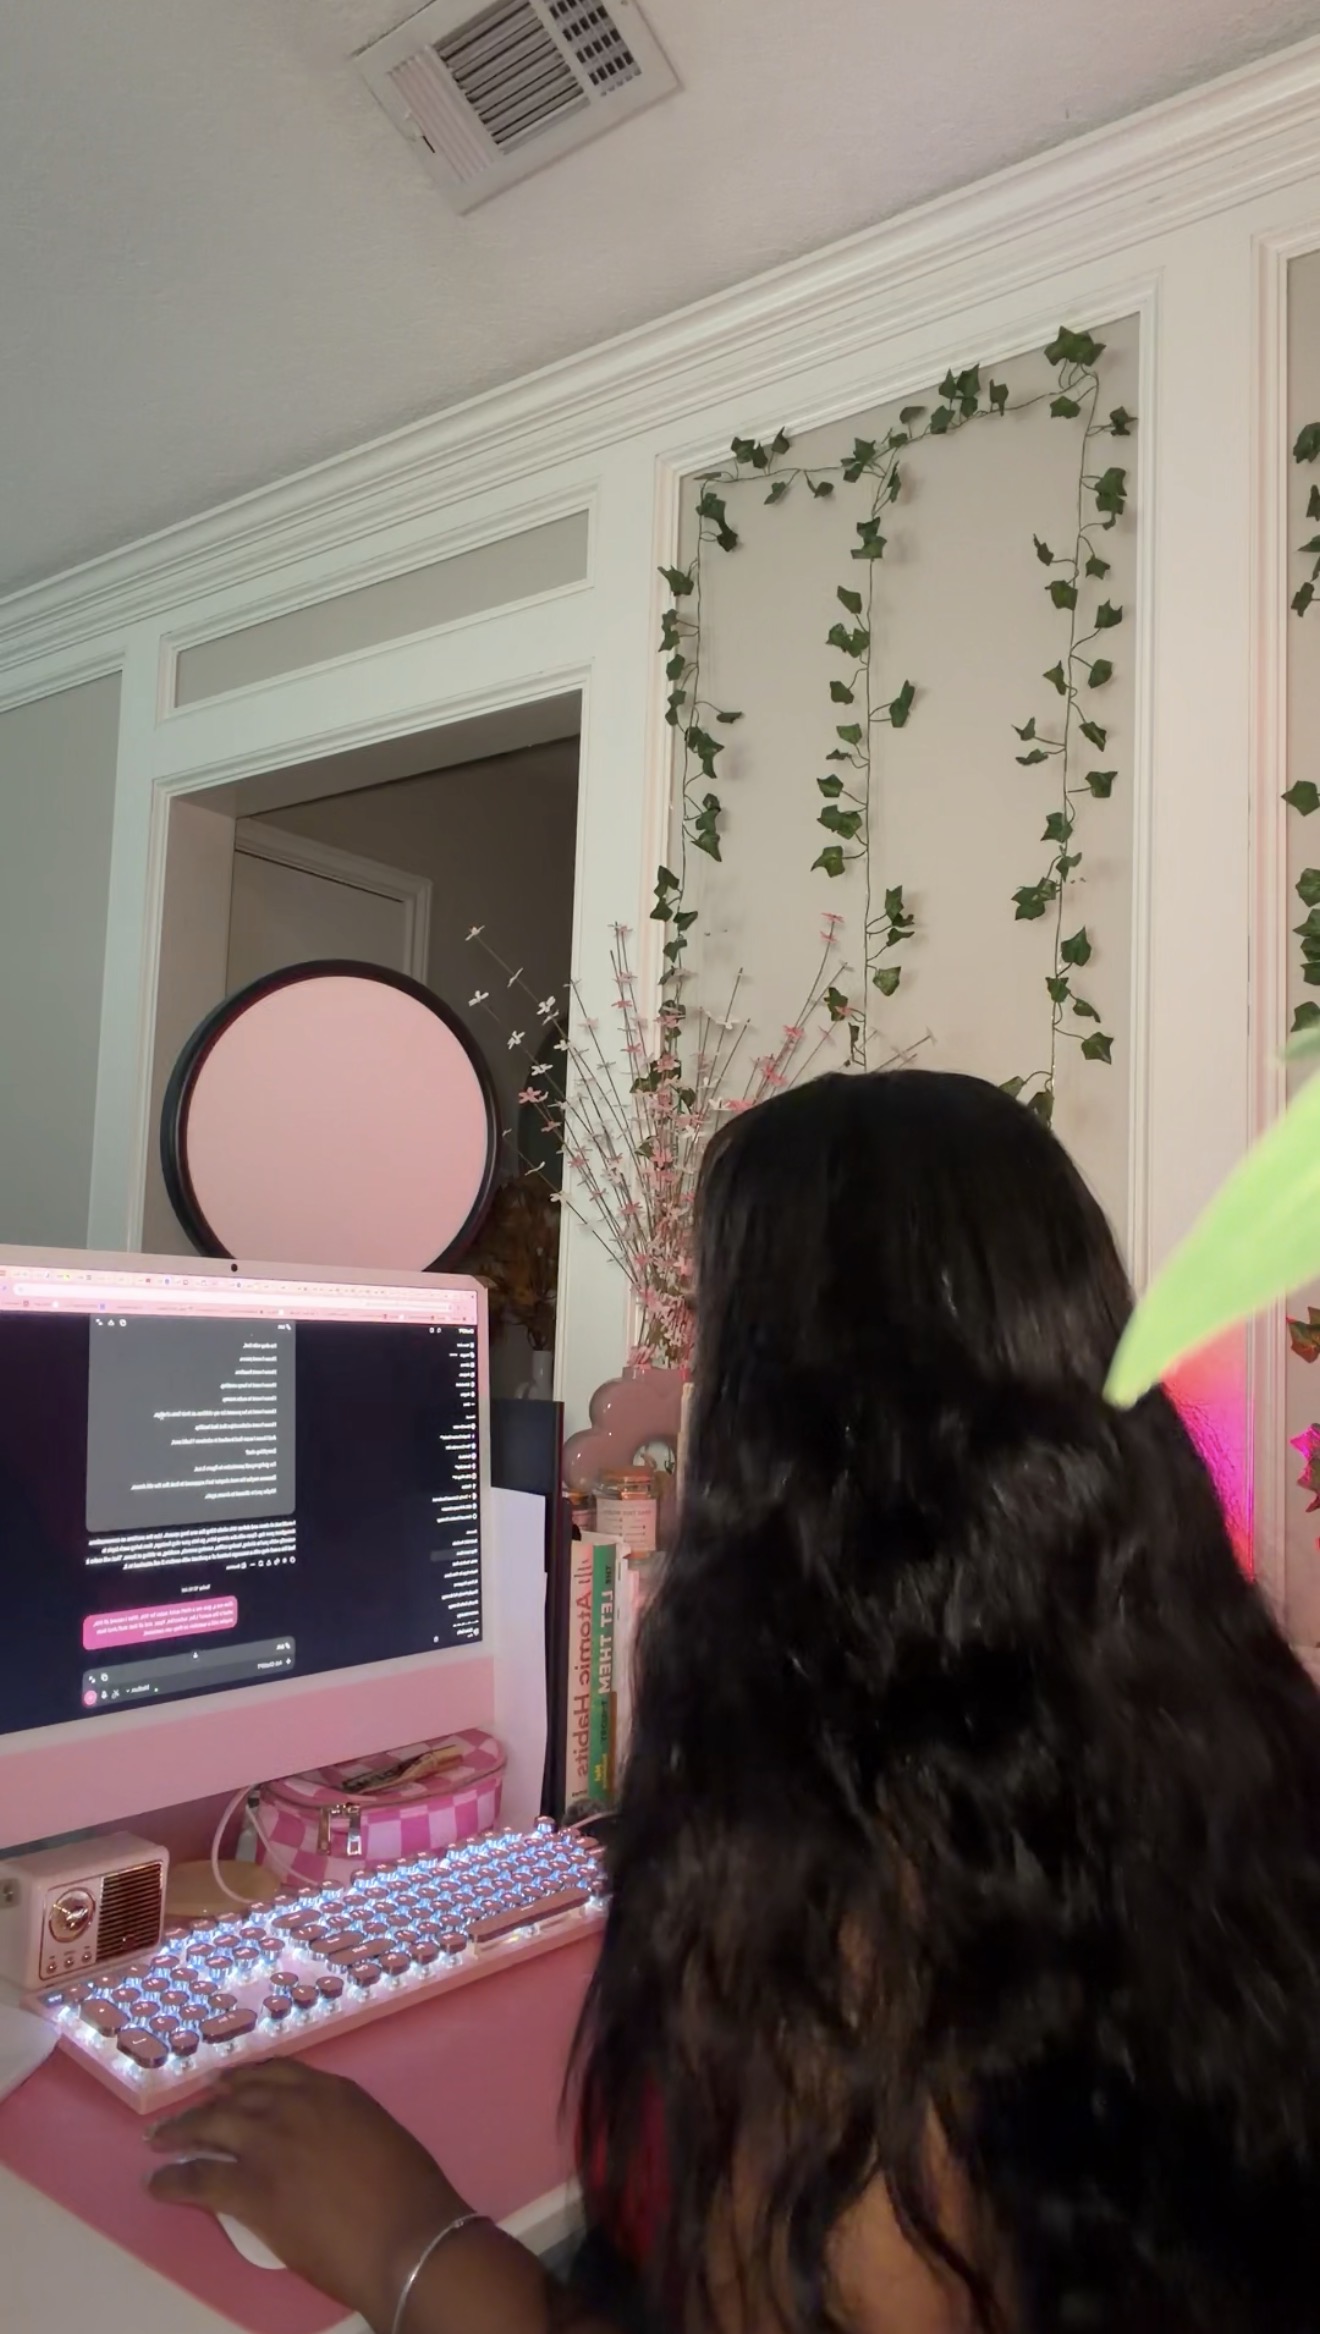
Over-the-shoulder shot from behind a woman working at a desktop computer
Angle 05

Over-the-Shoulder Shot

This shot lets the viewer see what you are seeing. It makes them feel like they are in the moment with you.

Use it for: laptop work, scrolling your phone, reading, editing, planning, or any scene where you want the viewer to look with you.
Keep in mind: these are still image examples, but the real B-roll clip will usually include movement inside the frame — typing, pouring, reaching, opening, sitting, walking, or turning.
Lesson 03

How long should you record each clip?

Most everyday B-roll does not need long recordings. You just need enough time before, during, and after the action so you have room to trim cleanly in CapCut.

The simple rule

Record 5 to 10 seconds for most clips.

Your final edit may only use 1 to 3 seconds. The extra footage gives you options.

1–2 sec
before
DO THE ACTION
1–2 sec
after
Press record first. Move second. Stop recording last.
~5 sec

Simple action

Opening a laptop, picking up keys, pressing a button, setting down a mug.

7–10 sec

Slower movement

Walking into frame, opening curtains, sitting down, walking away.

Full action

Multiple steps

Making coffee, packing a bag, skincare, getting ready. Let the full motion finish.

Do this every time

Start before the movement. Stop after the movement.

That little bit of extra space at the beginning and end makes trimming easier and keeps your final clips from feeling rushed.

Do not overthink the number. The goal is not to use the entire clip. The goal is to capture enough footage so you can choose the cleanest 1 to 3 seconds later.
Lesson 04

Everyday shot recipes

Pick what you are already doing, open the matching recipe, and copy the shots. You do not need a special day or a complicated storyline.

How to use these

Choose a variety of shots based on the story and length of your mini vlog.

Use a mix of wide, mid, detail, high angle, and over-the-shoulder shots. A quick mini vlog may need fewer moments, while a longer one may need more. Capture enough variety to tell the story naturally without feeling like you have to use every angle every time.

Recipe 01

Morning Routine

For slow mornings, getting ready, home routines, and simple day-in-the-life content.

  1. 1
    Walk into the room or toward the windowLet yourself enter the frame instead of starting already in position.Wide shot
  2. 2
    Open the curtains or blindsRecord the full movement and leave a second at the end.Mid shot
  3. 3
    Show one small morning detailSlippers, skincare, turning on a lamp, grabbing your robe, or pouring water.Close-up
  4. 4
    Film your hands doing somethingWriting, making the bed, opening a planner, or fixing breakfast.High angle
  5. 5
    Show what you are looking atYour phone, planner, laptop, devotional, or to-do list.Over the shoulder
  6. 6
    End with movement out of the sceneWalk away, pick up your bag, sit down to work, or leave the room.Wide or mid
Recipe 02

Coffee / Kitchen

For coffee at home, breakfast, meal prep, cooking, and kitchen reset content.

  1. 1
    Show the full kitchen or coffee areaGive the viewer context before you move closer.Wide shot
  2. 2
    Step into frame and start the routineReach for the mug, open the cabinet, or walk to the machine.Mid shot
  3. 3
    Capture the satisfying detailCoffee pouring, ice dropping, cream swirling, food sizzling, or a lid closing.Close-up
  4. 4
    Film the setup from aboveIngredients, mug, plate, cutting board, or hands arranging the moment.High angle
  5. 5
    Show the finished resultPick up the mug, plate the food, or carry it away.Mid or close-up
  6. 6
    Give the scene a natural endingSit down, take the first sip, wipe the counter, or walk away.Wide shot
Recipe 03

Desk / Workday

For working from home, digital business, planning, content creation, and admin days.

  1. 1
    Show the full workspaceLet the viewer see the desk and environment before you sit down.Wide shot
  2. 2
    Sit down and start workingOpen the laptop, move the mouse, type, or reach for your planner.Mid shot
  3. 3
    Get one close detailTyping, clicking, highlighting, writing, or plugging something in.Close-up
  4. 4
    Film the desk from aboveKeyboard, notebook, coffee, phone, and hands can all become part of the frame.High angle
  5. 5
    Let the viewer see your screen with youEditing, planning, answering emails, building a product, or creating content.Over the shoulder
  6. 6
    Close the work momentShut the laptop, stand up, grab your drink, or leave the desk.Mid or wide
Recipe 04

Getting Ready

For makeup, skincare, hair, outfits, beauty routines, and getting dressed.

  1. 1
    Show the getting-ready spaceBathroom, vanity, closet, bedroom, or mirror area.Wide shot
  2. 2
    Film yourself beginning the routineSit at the vanity, open the drawer, or step in front of the mirror.Mid shot
  3. 3
    Capture one product or detailOpening makeup, applying lip gloss, fastening jewelry, or buttoning your outfit.Close-up
  4. 4
    Film products or hands from aboveLay out makeup, accessories, skincare, or outfit details.High angle
  5. 5
    Use the mirror or behind-you perspectiveShow what you are doing without filming straight on.Over the shoulder
  6. 6
    Show the finished look in motionWalk past the camera, grab your bag, fix your hair, or leave the room.Mid or wide
Recipe 05

Errand Day

For grocery runs, appointments, school drop-offs, shopping, and normal days out.

  1. 1
    Start with the leaving-the-house momentGrab your keys, bag, sunglasses, or shoes.Close-up
  2. 2
    Walk toward or away from the cameraFront door, driveway, hallway, or parking lot.Wide shot
  3. 3
    Show one car momentOpening the door, buckling up, starting the car, or putting your bag down.Mid shot
  4. 4
    Capture a small detail from the outingCart handle, coffee cup, receipt, store sign, bag, or product in your hand.Close-up
  5. 5
    Show what you are seeingWalking into the store, browsing, looking at a menu, or checking your list.Over the shoulder
  6. 6
    End with coming back or moving onPut bags in the car, unload at home, or walk into the next stop.Wide or mid
Recipe 06

Cleaning / Reset Day

For cleaning, laundry, organizing, kitchen resets, and getting the house back together.

  1. 1
    Show the space before you startCapture the room, counter, bed, or area so the viewer understands what you are resetting.Wide shot
  2. 2
    Film yourself starting the resetPick up laundry, clear the counter, make the bed, or grab your cleaning supplies.Side angle
  3. 3
    Get one satisfying detailSpray the cleaner, wipe the surface, fold a towel, fluff a pillow, or stack something neatly.Close-up
  4. 4
    Show your hands working from aboveOrganize a drawer, fold clothes, arrange products, or reset a countertop.High angle
  5. 5
    Capture another part of the processVacuum, wipe a mirror, put things away, or move through the room.Mid or side angle
  6. 6
    Finish with the reset spaceShow the cleaned room, light a candle, sit down, or walk out of the finished space.Wide shot
Recipe 07

Shopping / Haul

For shopping trips, grocery hauls, new purchases, packages, and showing what you brought home.

  1. 1
    Start with the bags or packagesSet them down, carry them into the room, or place everything on the counter or bed.Wide or mid
  2. 2
    Open or unpack the first itemLet the camera catch your hands reaching in, opening tissue, or pulling something out.Side angle
  3. 3
    Show the item up closeCapture texture, color, packaging, labels, or one detail you want the viewer to notice.Close-up
  4. 4
    Lay everything out togetherArrange the haul on a bed, table, counter, or floor for an easy overview.High angle
  5. 5
    Interact with one itemTry it on, hold it up, place it where it belongs, or use it naturally.Mid shot
  6. 6
    End with the finished haul momentShow everything together, put the last item away, or walk out with the new purchase.Wide or over the shoulder
The point is not perfection

You are building a sequence, not filming your entire day.

These shot lists are examples, not rules. You do not have to use every angle every time. Use the angles that make sense for the moment, go with the flow, and keep what feels natural to you. Capture enough variety to tell the story you want to tell, whether you are making a quick mini vlog or something longer.

Lesson 05

How to make your B roll feel natural

You do not need to perform for the camera. The easiest B roll usually comes from doing a real action and letting the camera watch the moment.

1. Do the action for real

Actually make the coffee. Actually open the laptop. Actually pack the bag. Real movement almost always looks better than pretending to do something for the shot.

2. Set the camera first, then forget about it

Once your phone is in place, stop checking the screen. Step into the frame and focus on what you are doing instead of how you look while doing it.

3. Give yourself something to do

Stillness can feel awkward. Movement gives the clip a purpose. Reach, pour, type, walk, sit, open, close, carry, turn, or pick something up.

4. Walk into or out of the frame

You do not always have to start already standing in position. Entering or leaving the frame can make a simple shot feel more natural and less staged.

5. Look at the action, not the camera

For B roll, keep your attention on the coffee, laptop, mirror, planner, bag, counter, or whatever you are actually doing unless looking into the camera is intentional.

6. Repeat the action if you need to

If the first take feels awkward, do it again. Refill the cup, reopen the laptop, walk through the frame one more time. Nobody sees the takes you do not use.

7. Let the camera roll a little longer

Press record, settle into the frame, do the movement, then let the camera keep rolling for another second or two before you stop.

Remember this

You do not have to perform for B roll. You are just letting the camera watch the moment.

See it come together

Here is one simple mini vlog using everyday moments.

Different angles Natural movement Everyday moments Simple edits

This is just one example. You do not need to use every angle or follow the exact same order. Capture the moments that make sense for your day, then put them together in a way that tells the story naturally.